So, you have decided to track your website or blog (blog in my case) and started to searching for free web analytics tools and found that none other than Google provides one. Now you are under confusion that Google has two versions of analytics namely Classic Analytics and Universal Analytics. Don't be confused, go ahead and implement Universal Analytics. Of course the advantages are many which will take another post to talk about it.
Now that you have decided to use Universal Analytics on your blog, how do you implement it? Not the traditional way but the newer one using Tag Management tool. Again none other than Google's Tag Manager! (Read: Understand the Basics of Tag Management System).
In this post, I would like to explain you step by step process on how to implement Universal Analytics using Google Tag Manager (GTM) on your blog.
Setting up Google Universal Analytics Account for the website
The first step in the process is to create a new Google Universal Analytics account for your website. If you have a Google account, signing up for a Universal Analytics account is like buying a chocolate. Go to analytics.google.com and set up a new account. While you are setting up a new account, Google prompts you for your choice of analytics tool. Since we have decided it to be Universal Analytics, we will go with the default settings as shown in the picture. Give your account a name and fill in the domain name of your website as shown in the picture highlighted with a blue colored arrow.
Once you have entered all the details, proceed to the further step. Now you need to accept the terms and conditions to use the tool and once accept that your account will be created and you will be presented with a tracking code, a JavaScript code and a Unique Tracking ID for your account. Copy that tracking ID and put it aside. Since we are implementing UA using GTM we do not need to use the JavaScript generated by Google.
Creating Google Tag Manager Account, your Container and connecting to your blog/website
So, we have successfully created the UA account. Next step is to create a new GTM Container. Go to Google Tag Manager and sign up for a new container using your Google ID. Once you start creating a new container inside GTM, you will be prompted to enter whether you are implementing GTM for web pages or Mobile apps. Since we are implementing it on a website, you can select web pages thereby entering corresponding website addresses.
Once you are done with the above process, GTM will prompt you with a piece of JavaScript code which needs to be placed on your website. Copy the code that has been generated and paste it on all the pages which you want to track using GTM.
If you are using a blogger blog, you can simply add a new HTML/JavaScript widget from the Layout and add the above generated code into the widget and save it. You are done. You have successfully implemented the Google Tag Manager Container on your website.
Adding New Tag
Now that your GTM container is set up on your website, it's time to connect your Universal Analytics to the website. Following picture highlights the GTM container's dashboard where you can see the Left side navigation containing all the important elements needed to implement new tags on the container. We will look into Rules and Macros in our future posts. For now we will concentrate on the creation of a new tag by clicking the button that is highlighted using Red arrow.
Once you click the New Tag button, you will be prompted for the creation of the new tag, where you can name the tag and select the type of tag from the in built templates of GTM. Since we are implementing Universal Analytics, we will select it from the drop down.
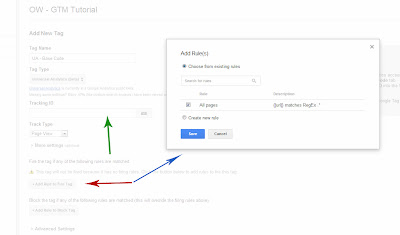
Once you select UA from the drop down, you will have some more configuration details that opens up. Now, its time to paste the copied Tracking ID that has been generated by UA initially into the box that has been highlighted by Green arrow in the below picture. After adding the ID, Click on "Add Rules" button and select the All pages check box and save the tag.
Creating Version and Publishing
Once your tag has been saved, you will be redirected to your dashboard, with the new tag showing up. Now it's time to publish the changes we have done to our container. So, create a version of the changes and Publish them.
That's all. You should be able to track the visitors from your site onto UA now!
If you have any questions in the above procedure, please leave your comments below.


No doubt at all, much appreciated post Ram. Pls keep posting/updating continuity of the same.
ReplyDeleteThank you very much Sandeep for the support :)
DeleteThank you Ram,
ReplyDeleteWhat will be the next step to track after Google tag manager? Am I need to go in my Google analytics to track tags?
Jigar
Hi Jigar,
DeleteThanks for the comment :) Yes, once you are done with the above steps you can now go to Google Analytics account and see the data coming up.
Ram
i am confused, can you please give me an example of tracking ID??
ReplyDeleteThanks,
Hey Michael,
DeleteTracking ID is the Unique ID of your Google Analytic profile for your website.
1. You can goto your Google Analytics account
2. Goto the Admin Tab
3. Under Property Section click Tracking Info
4. Under Tracking Info, click Tracking Code
5. The Alpha Numeric code which appears in a large text is your tracking ID for the profiel.
Hope this helps
-Ram