Recently I was working on a small requirement where I had to update all the 13 views under a Google Analytics property's Channel grouping rules. The catch here is the updated rules for all the 13 views look the same. I started updating the rules for one view and at the end of updating for one view, I am completely tired. So I was scared about the task that's in front of me. Then, I hacked into the Chrome Developer Tools and wrote some code and boom I was able to automate the processing of entering the rules and save it all in one click.
What is Channel grouping?
A person can come to your website from any source may it be via a search engine or a third-party website or in some cases the person might have bookmarked your website and open it directly. There is an umpteen number of sources through which a person come to your website. So, a good Analytics tool should be able to track such sources and present them in a nice and understandable fashion. Also, it is important to categorize these sources in a proper way. This categorization we call as Channels. For example, you may define a channel called Organic Search under which all the traffic that came to your website from different search engines can be kept. In the same way, all the traffic from different Social networks can be categorized as a Social Channel. Google Analytics does this fine with some amazing inbuilt mechanism to categorize the traffic into different channels which are intuitive and useful. If you want to view the settings for these rules, you can navigate to your Admin panel and check for them as shown in the picture.
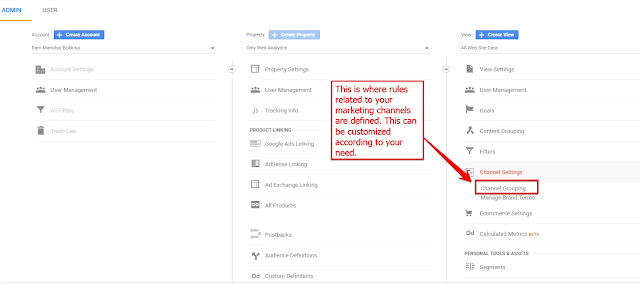 |
| Place where you can find channel grouping for your view! |
|
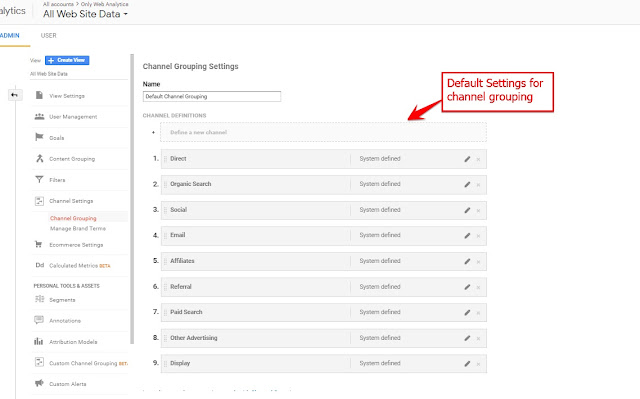 |
| Default channel grouping rules are given by Google Analytics |
|
Most of the times there won't be a necessity to change these settings. But if you are working in an organization which has diverse marketing campaigns, you ought to change these settings to categorize your traffic properly so that your executive and marketing team has a better outlook on the numbers for each of these channels.
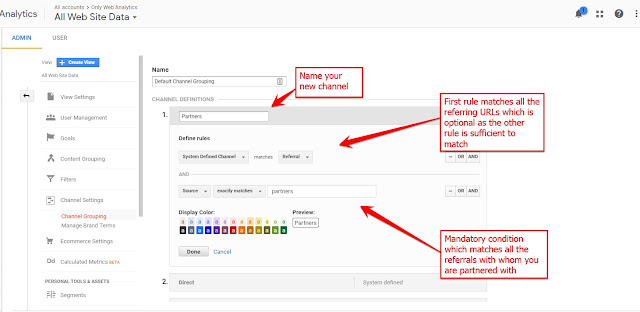
One important thing to note here is these rules follow the order and the first rule that matches your customer's attributes wins the race. For example, when a customer comes to your website using a link on a third-party website with whom you have a partnership. If you use the default settings, your user will be categorized as Referral traffic but which is wrong. So, in this case, you need to define a new rule which precedes Referral rules and add your relevant conditions. Let's say we want to name this traffic as Partners and you know all the websites with which you are partnered. So, you ask them to pass a utm_source query parameter with value "partners" as part of your URL. we have to create a new Channel in front of Referrals and create a rule set as shown below.
 |
|
|
The concept looks fine and easy. The problem starts when you have to add multiple channels with multiple rules inside. If you have to add 20 channels with each channel has at least 3 rules. You have 60 things to do, which will definitely take at least 30 minutes of your time. Imagine if you have to do the exact same thing for 10 views! For people like me, it will take forever and sometimes I even do mistakes in such cases.
So, I thought I should write some code to automate this process instead of doing the same tedious thing again and again. My main motto is if you can do it using Keyboard and Mouse, you should be able to do it via JavaScript. I spent 1 hour on writing JavaScript code on Developer tools and finally came up with a code which can be used by anybody for their purpose. The code I came up with is given below.
Code to Automate and Explanation
Let 's dissect the code and understand what is going on. The first part of the code is the definition of a JavaScript Array of objects which holds all the data related to our new channel group rules. This is to make sure all your rules are defined clearly and easy to add/edit/delete accordingly. Each object in the array is related to each channel and identified by "channel".
channels[position].channel will give us the value of the channel. For example channels[2].channel will give you Webinar in the above example. Any rule inside has three parts to it. One the left side drop-down, the selector in the middle and the value on the right side. These rules are part of "data" under the object. If you have more than one rule, add more of these objects under "data". Occasionally, you might have a special case of adding "ADD" in the rules, in that case, you need to add "operator": "ADD" to the list as shown in the "Social Organic" channel ruleset in the above code. If all your rules are just doing an "OR" operation, you don't need to add the operator.
After defining our data store, it's time to remove all the existing rules on the page. The code following the array does exactly the same thing by deleting all the existing rules. Now the code after that iterates over our "channels" array and adds all the channels in the reverse order and needed rules. Take a look at the screenshot below which shows Direct at the bottom which is defined at the top of our "channels" data store. So, if you want a particular order of channels A, B, C, D, E you place them as E, D, C, B, A in your data store.

Where to run this code?
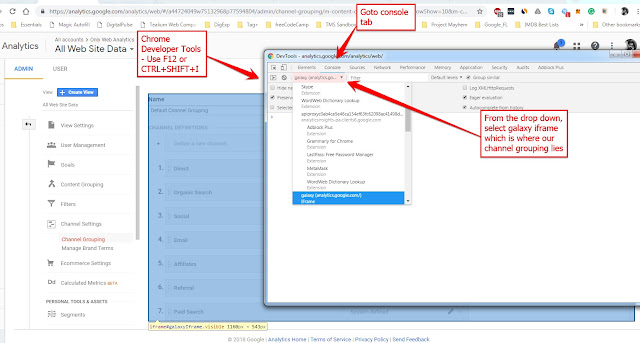
Now comes the interesting part, you have understood what the code does but where do you need to run this code. If you have Google Chrome installed, open the page on Google Chrome and open the Developer tools either by hitting F12 button or CTRL+SHIFT+I. As shown in the below picture, navigate to "Console" tab and select galaxy (analytics.google.com) frame from the drop-down. Remember if the selection is any other thing, your code will not work.
 |
| Google Developer Tools - Where to navigate? |
|
Now, paste your code below, hit enter and wait for the magic to happen. Once the code has run successfully, you will see an alert with the success message. Now, make sure you review the rules before saving them.
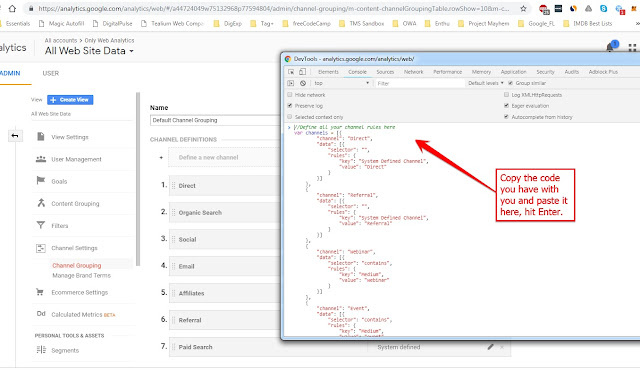 |
Google Developer Tools - Place to paste your code
|
|
That's all folks! I hope this code saves your time. It saved almost 7 hours of my time. If so, don't forget to leave a comment, if you are unable to use the code, let me know in the comments section. Keep reading the blog and support!


No comments :
Post a Comment